For ages, Windows has been the better platform for PC gaming, as it offers the desired gaming experience. While Linux OS now supports some games through Proton, it has not yet become a mainstream option. With the latest Windows 11 operating system widely available, performance is generally better. However, if performance isn’t meeting your expectations, this in-depth guide will help you optimize your PC for gaming.
Although Microsoft designed Windows 11 with enhanced gaming performance in mind, many users still struggle to achieve optimal results. Even with a powerful gaming setup, tweaking specific settings and making adjustments can significantly improve performance. Additionally, optimizing GPU settings and increasing the frame rate can help you achieve maximum gaming performance on Windows 11.
Before You Proceed: Create a Restore Point
Though adjusting multiple Windows 11 settings might not affect the overall user experience in general, we’ll recommend you create a restore point to be on the safer side. In case your system doesn’t work as expected, you can always go back to the previous state using a restore point as a backup.
Don’t know how to create a restore point on Windows 11? Check the steps below:
- Open the Start menu on your system.
- Type restore point and click on Create a restore point to get into it.
- Now, click on the Local Disk (system drive) to select it.
- Click on the Create button to add a restore point.
- Type a description for this restore point. For example, Windows 11 Optimization.
- Finally, click on Create > Wait for it to complete.
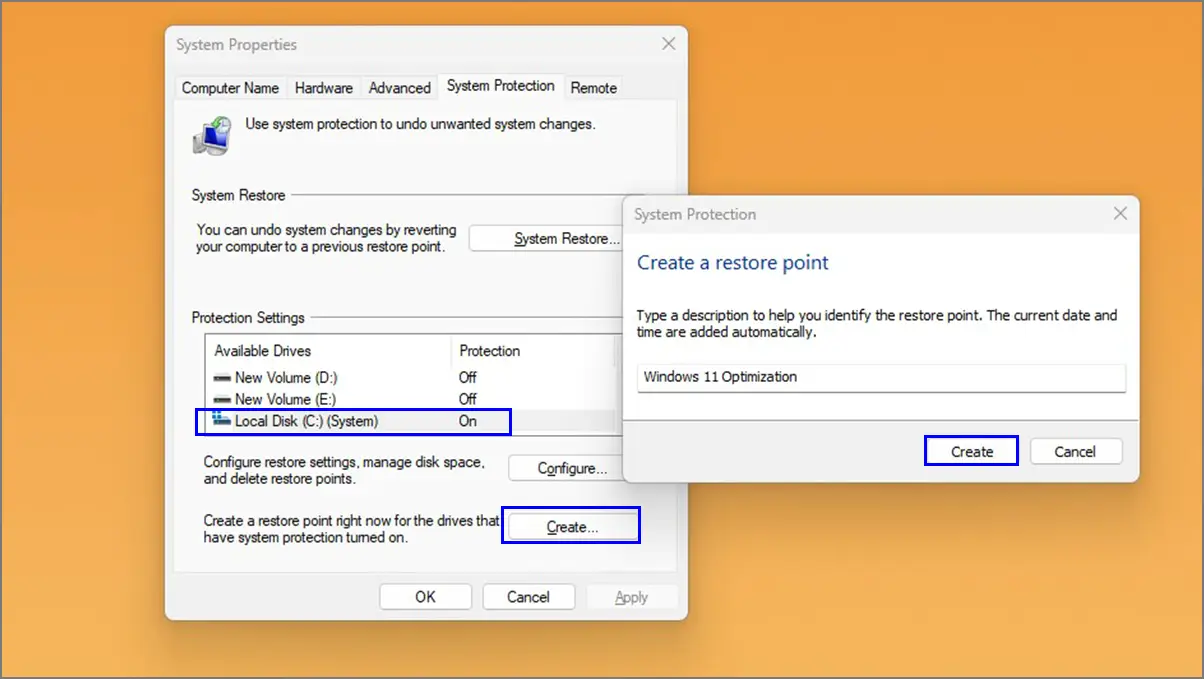
Whenever you need to restore your PC to this point, go to System Restore > Click on Next > Select the created restore point and follow the on-screen instructions.
How to Optimize Your Windows 11 PC for Gaming Performance
Now, it’s time to get into the Windows 11 optimization guide to improve the overall gaming performance to achieve better FPS, minor lags, and glitches. Depending on the PC configuration and what kind of gaming you’re expecting, you can try performing respective tips.
1. Set a Lower Display Resolution
If you’re using a budget or mid-range gaming PC, make sure to set a lower display resolution, which can offer steady performance. Using high-resolution displays will consume higher system resources, and your game will start losing its FPS.
To achieve a stable 60 FPS mark, try lowering the in-game display resolution. This specific method should be followed for each game you want to run better.
It’s always recommended to use a display resolution of 1080 x 1920 pixels by default if you’re using a full-HD monitor and your system supports it. However, reducing the resolution to 900 x 1600 pixels may also help get a higher FPS count instantly if the graphics card struggles to perform. Lowering the resolution to 720p will boost the overall performance in no time, but the visual experience will be affected.
2. Turn On Game Mode
Game Mode is a built-in option for the Windows 10 or higher operating system that allows you to restrict background processes up to some extent and boosts the FPS mark in video games. It works natively on all PC games, and you’ll get a better experience on Windows 11 because it utilizes resources quite effectively while gaming. Here’s how to enable it:
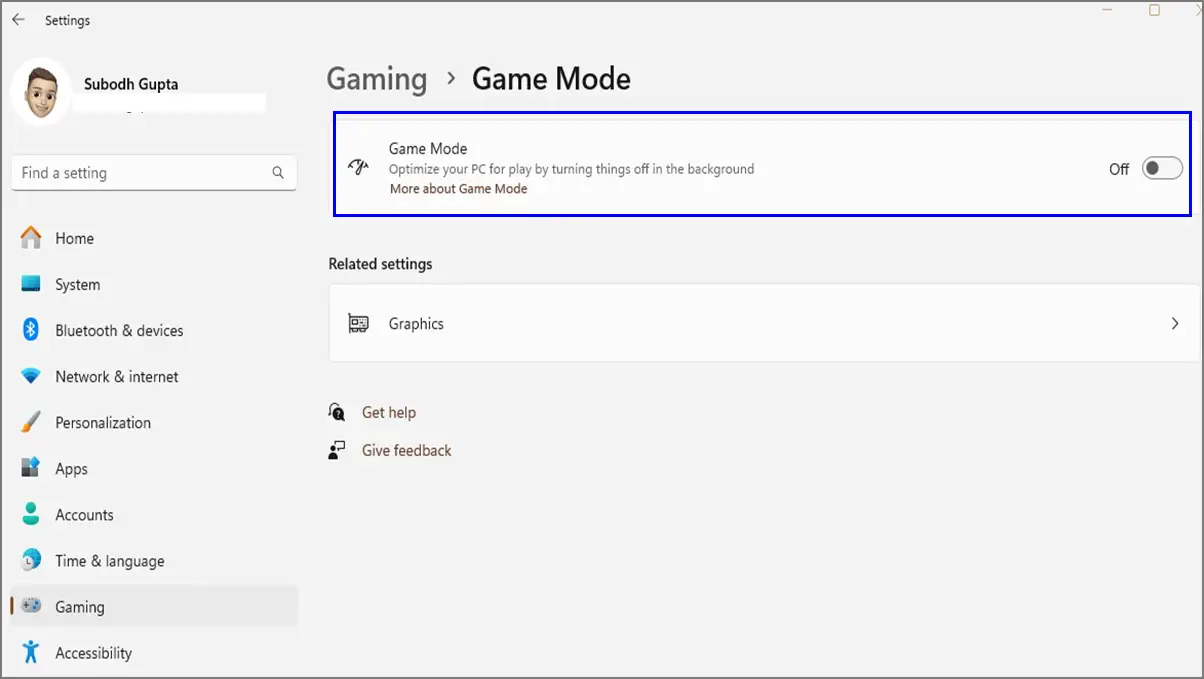
- Press the Windows + I key combination to open Settings.
- Now, click on gaming from the left pane.
- Click on Game Mode > Turn On the Game Mode toggle.
3. Turn Off the Xbox Game Bar
The Xbox Game Bar is one kind of overlay feature on Windows 11 that allows you to take screenshots, capture gameplay videos, etc. But it tends to consume higher system resources, which is why we recommend you turn it off.
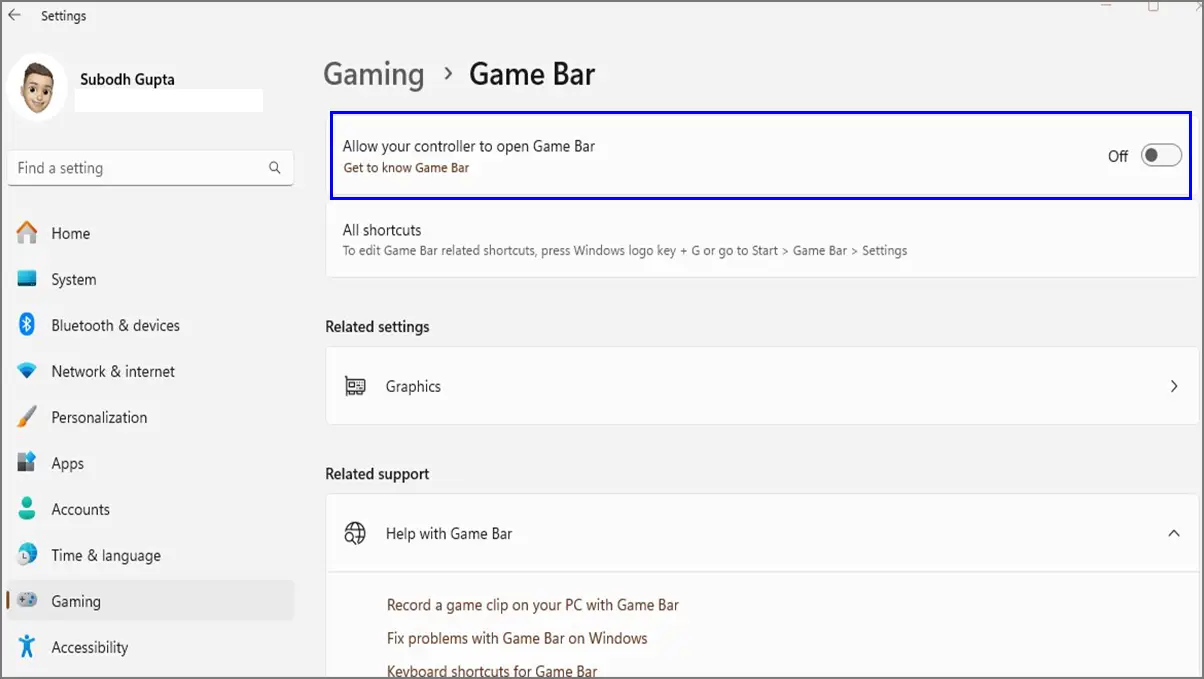
- Press the Windows + I shortcut keys to open Settings.
- Now, click on gaming from the left pane.
- Click on Game Bar.
- Enable the toggle that says Allow your controller to open Game Bar.
4. Turn On Storage Sense
Storage Sense on Windows 11 automatically frees up the disk drive space by removing unnecessary files or cache data like temporary files, items in the Recycle Bin, DirectX Shader Cache, etc. You should turn it on for storage optimization.
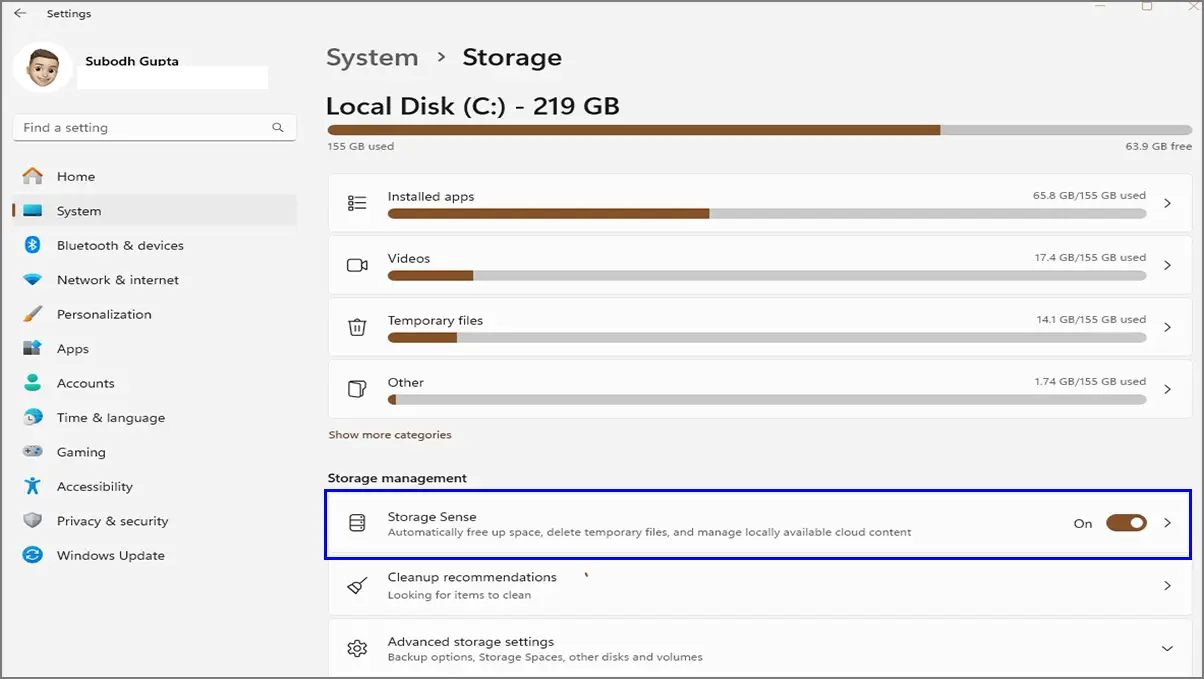
- Press the Windows + I shortcut keys to open Settings.
- Click on System from the left pane.
- Now, click on Storage from the right pane.
- Enable the Storage Sense toggle.
- Then click on the side arrow icon to open it.
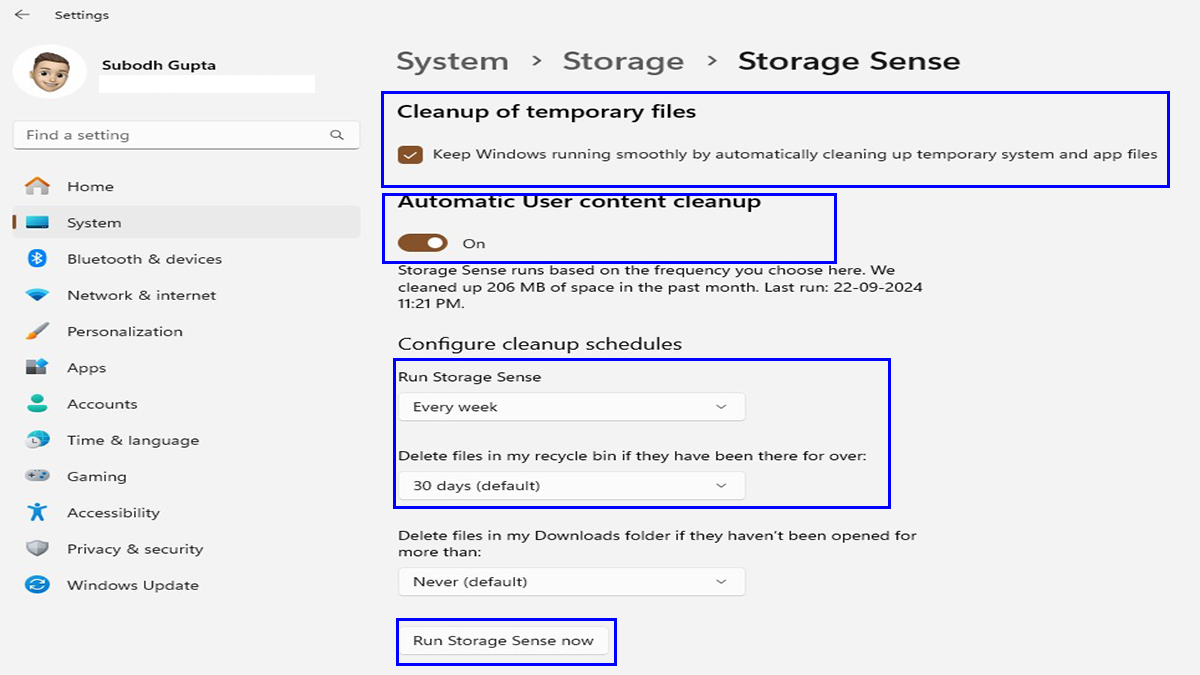
- Turn On the Cleanup for temporary files option.
- Enable the Automatic User content cleanup toggle.
- Be sure to set Run Storage Sense every week.
- Set Delete files in my recycle bin if they have been there for over – 30 days (default).
- Finally, hit Run Storage Sense now and wait for it.
- Once done, restart the system.
5. Set the Correct Monitor Refresh Rate
Always check if the correct monitor refresh rate is selected on the Windows 11 display settings.
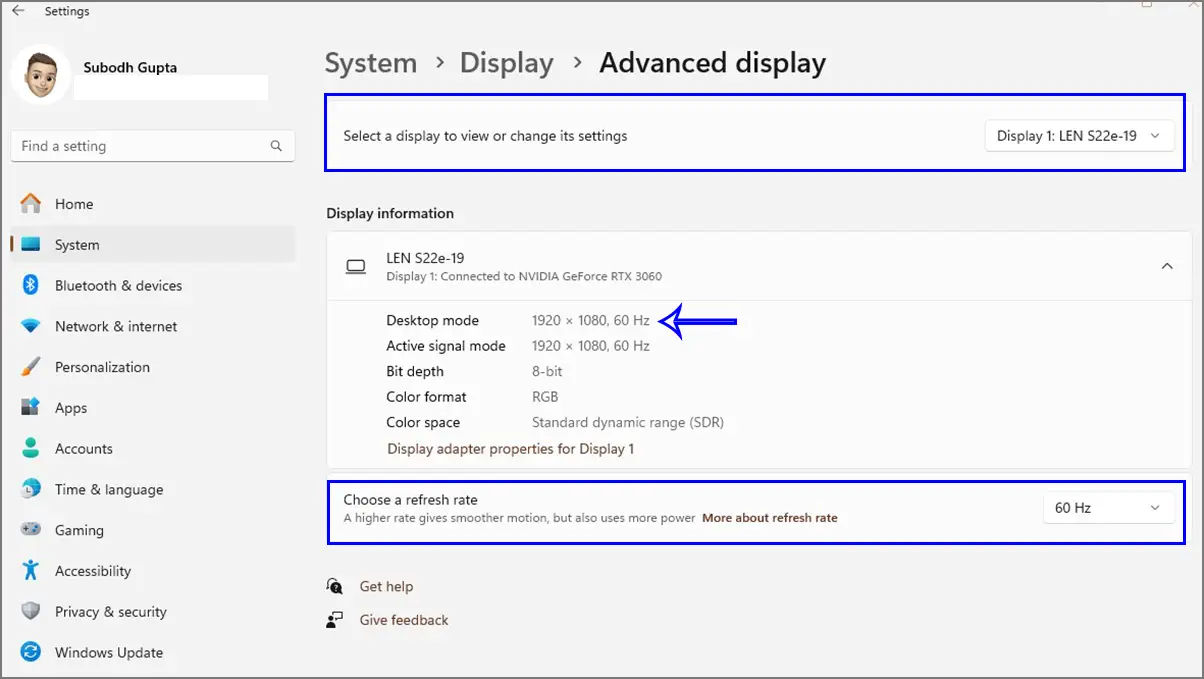
- Press the Windows + I shortcut keys to open Settings.
- Click on System from the left pane.
- Now, click on Display from the right pane.
- Go to Advanced Display > Select the correct display device.
- Then, set a correct refresh rate under Choose a refresh rate. (i.e. 60/90/120 Hz)
- Set the same refresh rate in the game display settings too.
6. Keep the GPU Driver Up to Date
Avoid using outdated display drivers on your Windows machine to get better compatibility with the monitor’s display resolution. If you’re using a new PC and a new monitor for the first time, be sure to install the display driver as per the graphics card model.
For Nvidia GPU:
- Head over to the official Nvidia website and download the GeForce Experience app.
- Install and run the Nvidia GeForce Experience app.
- Go to the DRIVERS section.
- Here, you’ll be able to CHECK FOR UPDATES.
- Check if a new GeForce Game Ready Driver update is available.
- If so, click on the DOWNLOAD button.
- Wait for it to download > Hit EXPRESS INSTALLATION.
- If prompted, click on Yes to allow the changes.
- Now, you’ll have to wait for the display driver to be installed.
- Finally, reboot the computer to apply changes.
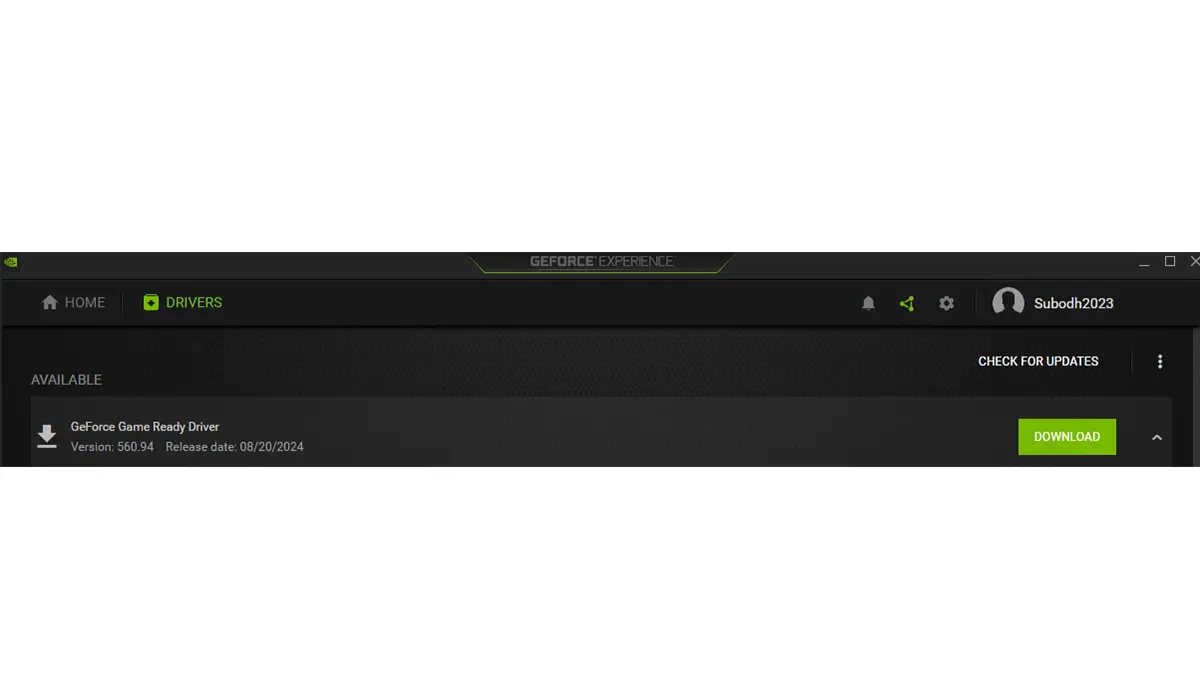
Otherwise, you can manually visit the Nvidia Drivers section and download the latest game-ready driver for your specific GPU model & operating system.
For AMD GPU:
- Right-click on your desktop screen.
- Select AMD Radeon Settings.
- Click on Updates at the bottom menu.
- Select Check for Updates.
- If a new driver is available, it’ll show New Update.
- Click on Download and Install.
- Click on the latest driver version from the list.
- Next, select Express Upgrade, which will install only the core components of the driver package.
- Click on Proceed to start the upgrade process.
- The driver package will begin downloading and installing.
- Wait for this process to complete.
- Once done, reboot the computer.
Otherwise, you can manually visit the AMD Drivers and Support page. Here, you can simply download the Windows 10/11 Drivers program on your system. Run the installer, and it will auto-detect and install the required latest driver for AMD Radeon series GPUs and Ryzen CPUs. It’s recommended for Win10/11 64-bit version 1809 and later.
7. Use Advanced System Settings
You can use another effective method to optimize your Windows 11 PC for gaming performance. If your PC is powerful enough, you can skip this method.
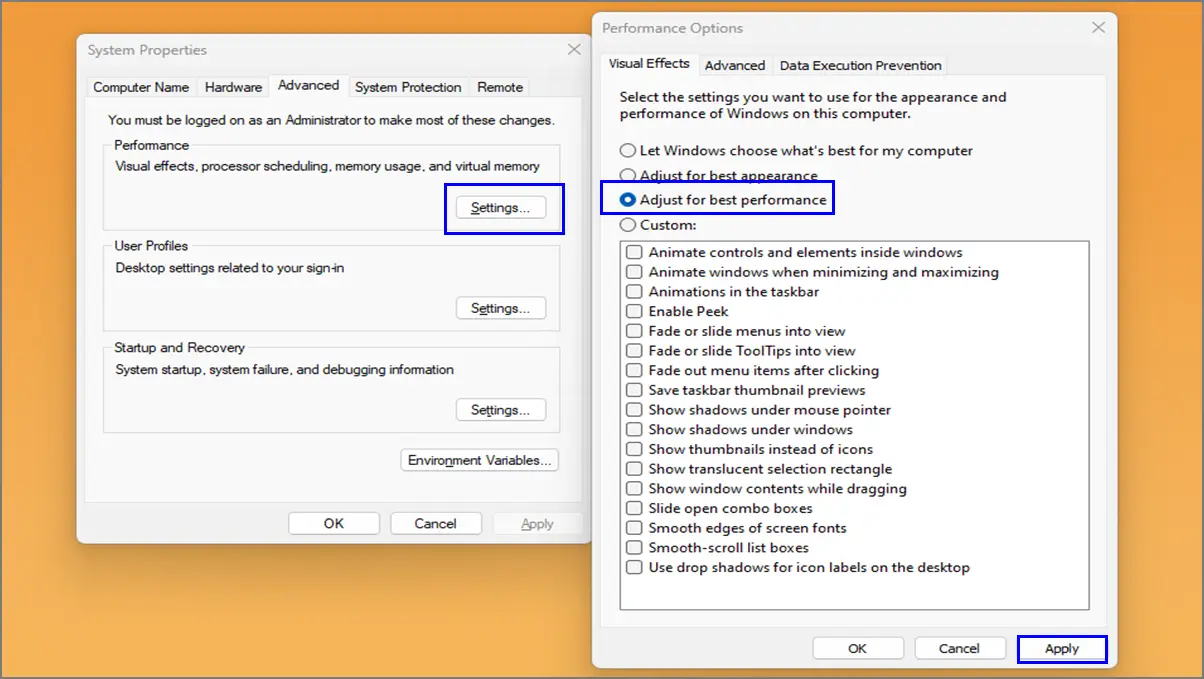
- Open the Start menu > Type View Advanced System Settings.
- Under the Performance section, click on Settings.
- Now, select Adjust for best performance under the Visual Effects section.
- You can enable some necessary options like ‘Show thumbnails instead of icons’ and ‘Smooth edges of screen fonts’ if you want.
- Once done, click on Apply and hit OK.
- Make sure to restart the system.
8. Enable Do Not Disturb
Before launching any PC game, enable DND (Do Not Disturb) mode temporarily on Windows 11 to avoid annoying notifications and alerts.
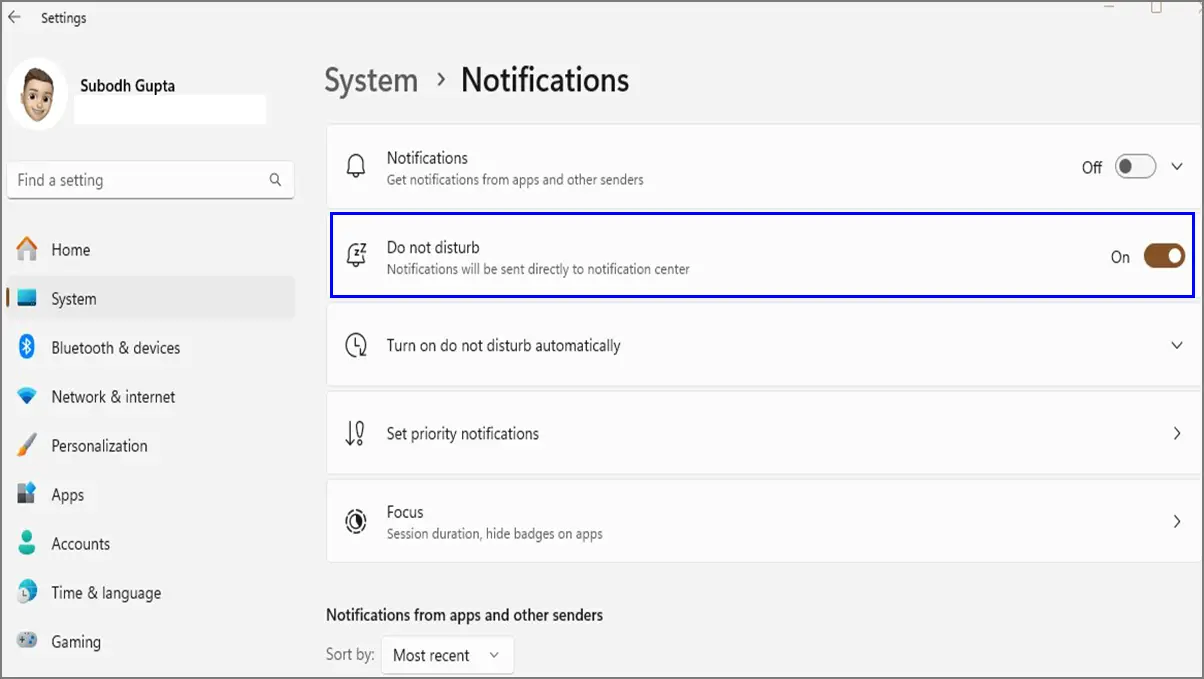
You can open Settings by pressing the Windows + I shortcut keys. Then go to System > Click on Notifications and Enable the Do Not Disturb toggle. You can also set the schedule for DND for any specific time by turning on the Turn on Do Not Disappoint Automatically option.
9. Turn Off Mouse Acceleration
Most battle royale FPS titles require precision aiming to hunt down enemies to increase chances of winning. Therefore, it’s a better idea to manually turn off the mouse acceleration feature on Windows 11.
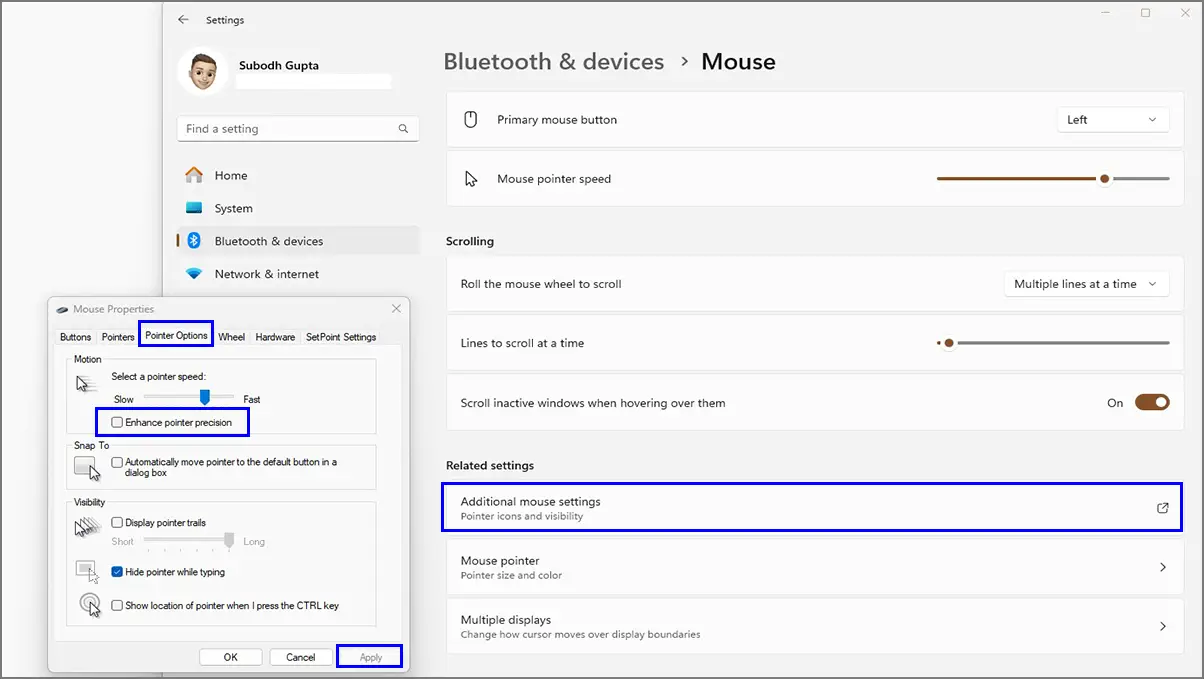
- Head over to Settings from the Start menu.
- Go to Bluetooth & Devices > Click on Mouse.
- Click on Related Settings > Click on Additional mouse settings.
- Go to the Pointer Options tab > Uncheck the Enhance pointer precision option.
- Click on Apply and hit OK to save your changes.
10. Choose High-Performance Power Plan
If you’re not getting the desired system performance overall except for gaming, the power plan is set to balanced mode by default. You should select the high-performance power plan for your desktop or laptop to get the best results. However, the high-performance power plan will draw more power, which may result in extra electricity bills.
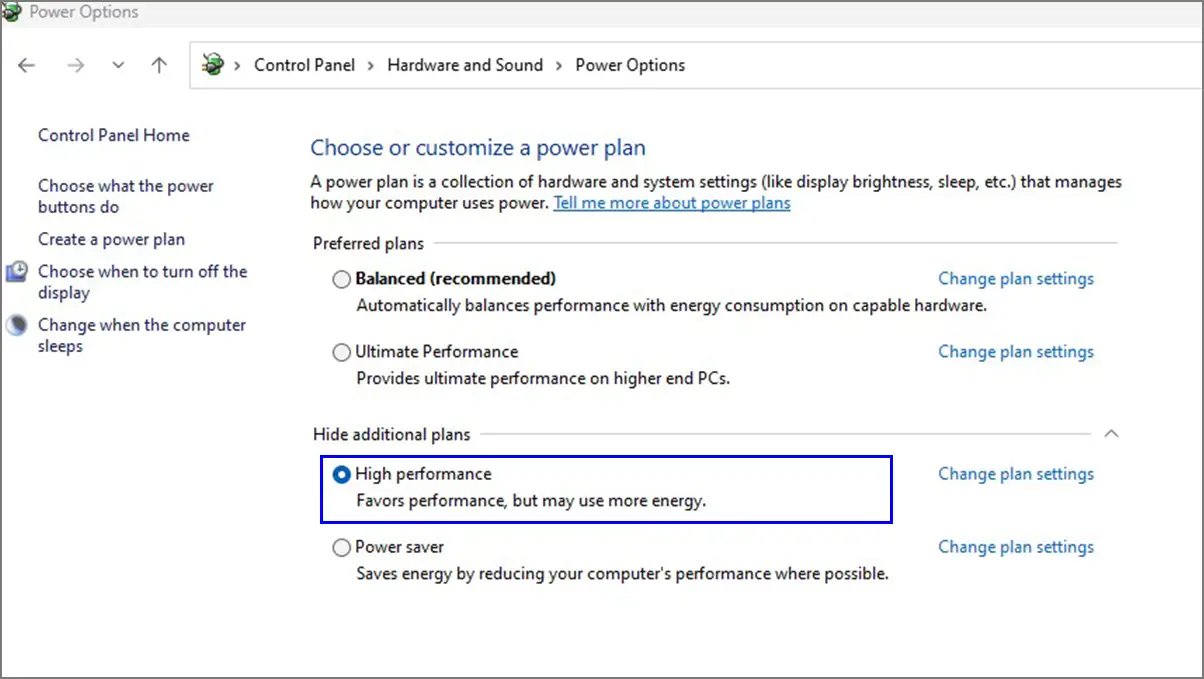
You can go to the Start menu > Search for Control Panel and open it. Set the View by option to Category at the top right side. Now, click on Hardware and Sound > Click on Power Options > Select High Performance from the power plan option.
For high-end PCs, you can choose Ultimate Performance for extreme gaming improvements.
11. Disable Startup Apps
Excessive background apps running right from the system boot can slow down overall performance. Disabling startup applications can free up system resources.
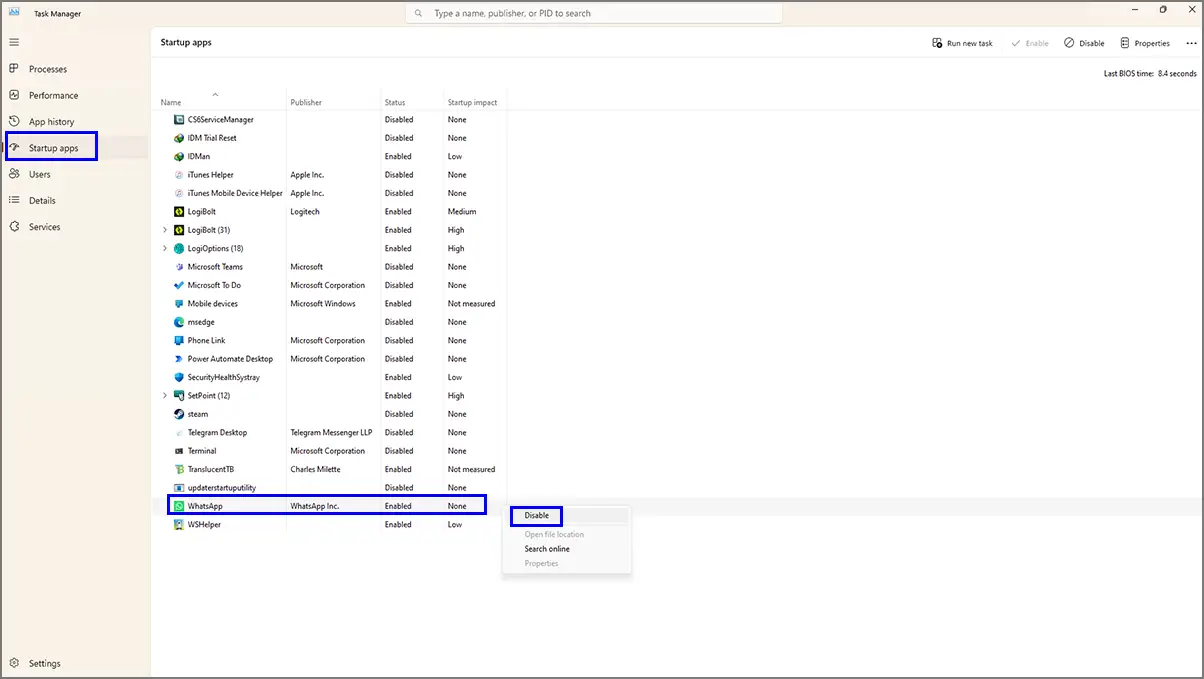
- Right-click on the Taskbar > Go to Task Manager.
- Click on Startup Apps from the left pane.
- Carefully check all apps one by one. If any 3rd-party or unnecessary program has a mid or high startup impact, disable it.
- Right-click on the application and hit Disable.
- Do the same step for all unnecessary programs.
- Once done, reboot the computer to apply changes.
12. Adjust Nvidia Control Panel
Try tweaking some settings in the Nvidia Control Panel for optimized gaming.
- Right-click on the desktop screen.
- Open the Nvidia Control Panel.
- Click on Manage 3D Settings from the left pane.
- Now, head over to the Global Settings from the right pane.
- Set Image Scaling – On. [push the drag sharpen slider to 30%]
- Set Ambient Occlusion – Quality. [for high-end PCs, use performance]
- Turn Off – Anisotropic Filtering. [16x for high-end GPU]
- Set Antialiasing Mode – Off.
- Set Low Latency Mode – Ultra.
- Select your graphics card for OpenGL Rendering GPU.
- Set Power Management Mode – Prefer maximum performance.
- High performance – Texture Filtering.
- Set Vertical Sync – Turn Off.
13. Tweak the AMD Control Center
For AMD CPU and graphics card users, check the adjustments below.
- Open the Start menu > Search for AMD Radeon Settings and open it.
- Click on the Gaming tab > Hit Global Settings.
- Set Anti-Aliasing Mode – Use application settings.
- Set Morphological Filtering – Off.
- Use 16x – Anisotropic Filtering.
- Set Texture Filtering Quality – Standard.
- Turn On – Surface Format Optimization.
- Set Shader Cache – AMD Optimized.
- Set Tessellation Mode – Override application settings.
- Use Always Off – Wait for Vertical Refresh.
- Set OpenGL Triple Buffering – On.
- Frame Rate Target Control should be set to the preferred limit. [i.e., 60 FPS or more]
14. Adjust In-Game Video Settings
Always try to adjust the in-game video and graphics settings on your Windows 11 PC to ensure there is no conflict between the system settings and game settings. Turn off the vertical sync feature first and try minimizing shadows, texture quality, etc, for better FPS.
15. Remove Unused Apps and Bloatware
If you’re not using any third-party application for a while and any kind of bloatware has been installed without your consent, try uninstalling the program manually as follows:
- Press the Windows key to open the Start menu.
- Go to Settings > Click on Apps.
- Click on Installed Apps.
- Search for the specific 3rd-party app that you want to delete.
- Now, click on the three dots icon next to it.
- Select Uninstall > Follow the on-screen instructions to complete uninstallation.
16. Enable High-Performance Graphics
Maybe the Windows 11 system isn’t utilizing your dedicated graphics card for the particular game. It may happen if the integrated graphics card with your Intel/AMD chip is selected as the default. However, choosing the High Performance mode for Graphics can help you here.
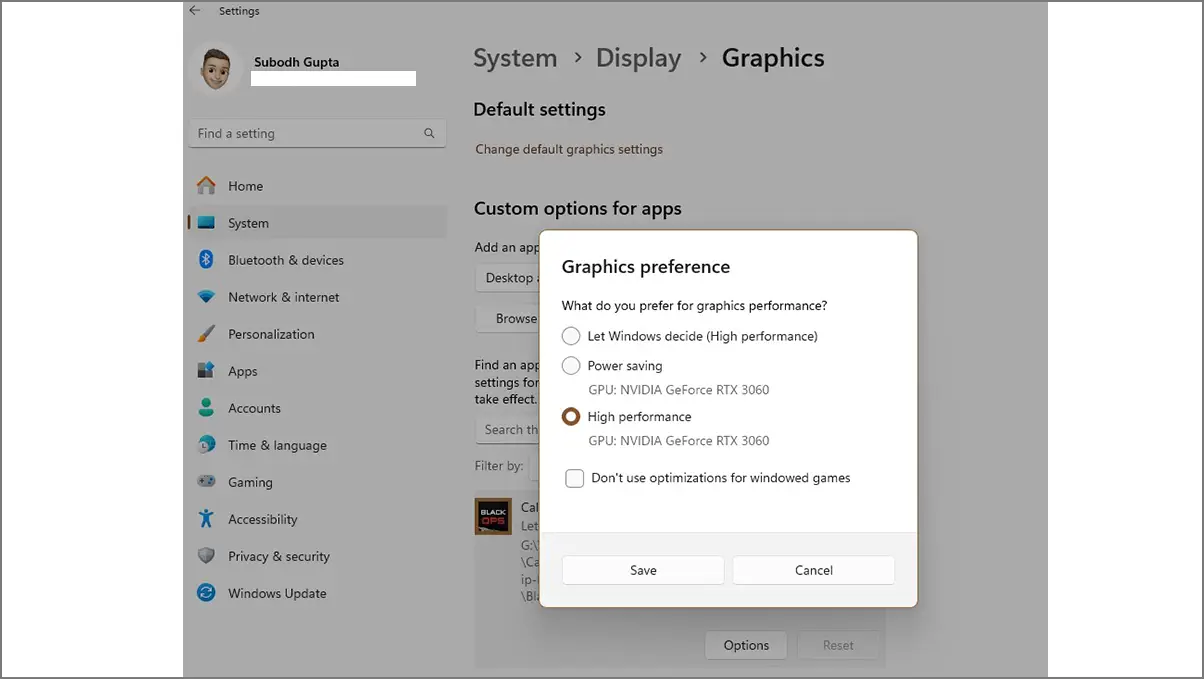
- Press the Windows + I shortcut keys to open Settings.
- Head over to System > Click on Display > Go to Graphics.
- Search for a particular game from the list and select it.
- Click on the Options button > Select the High-performance option.
- It’ll automatically enable the dedicated GPU for the respective title.
- Click on Save, then click on Change default graphics settings.
- Enable the Hardware-accelerated GPU scheduling option.
17. Keep the Machine Cool
In case you’re using a gaming laptop or a budget-friendly gaming PC, then try to close all games and applications. Then, shut down the system for at least half an hour to give it some rest. Excessive use of machines for longer hours and lack of air ventilation can cause system performance issues like lags, stutters, FPS drops, etc.
18. Install Windows Updates
Well, keeping your Windows system and additional drivers up-to-date can make a massive improvement in performance. Open Settings by pressing Windows + I shortcut keys > Click on Windows Update from the left pane. Now, hit Check for updates > If a new update is available, hit Download and Install.
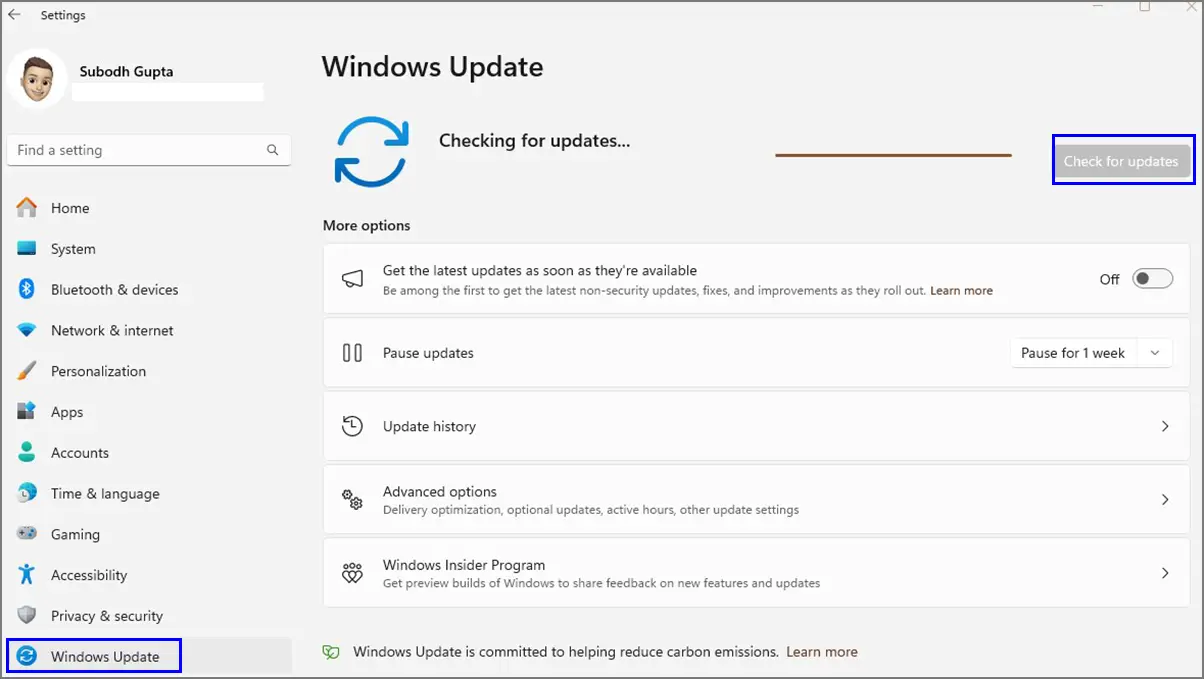
You can also go to Advanced options > Turn Off Delivery Optimization > Then click on Optional updates. If a driver update is available, checkmark the box & click on Download & Install. Wait for it to complete and reboot the PC.
19. Do Not Use In-Game Overlays
Sometimes, in-game overlay apps can help you chat with friends, take screenshots, record video clips, etc. However, in-game overlays consume higher system resources while gaming, resulting in slower gameplay performance. So, if you’re using any specific in-game overlay like Steam overlay, GeForce Experience overlay, or Discord overlay, try turning it off and check for improvement.
20. Disable Memory Integrity and Virtualization
Memory Integrity and Virtualization are built-in Windows 11 security features that come pre-enabled. Memory Integrity offers better protection of your kernel from unexpected malware attacks. So, you can try turning them off temporarily to check if the gaming performance increases.
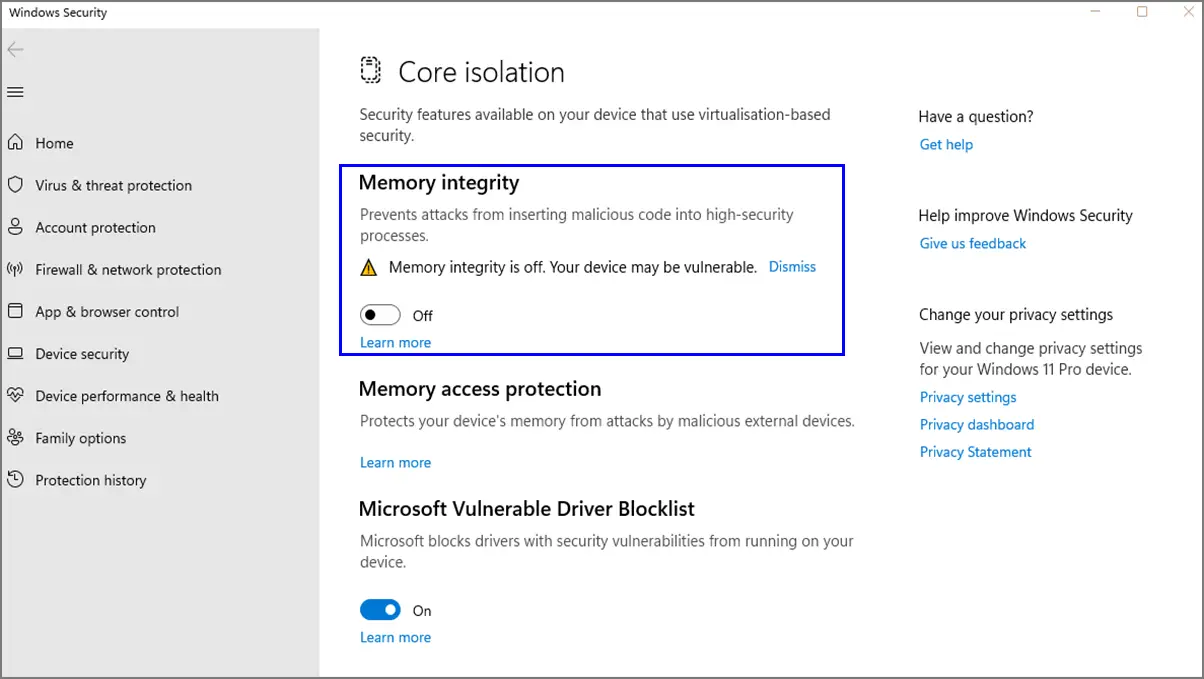
- Open the Start menu > Search for Core Isolation and open it.
- It’ll open the Windows Security app page.
- Turn Off the Memory Integrity toggle.
- You may need to reboot the system to apply changes.
Meanwhile, virtualization offers support for the system through virtual machines. Both services do come at the cost of consuming higher system resources. So, turn it off manually.
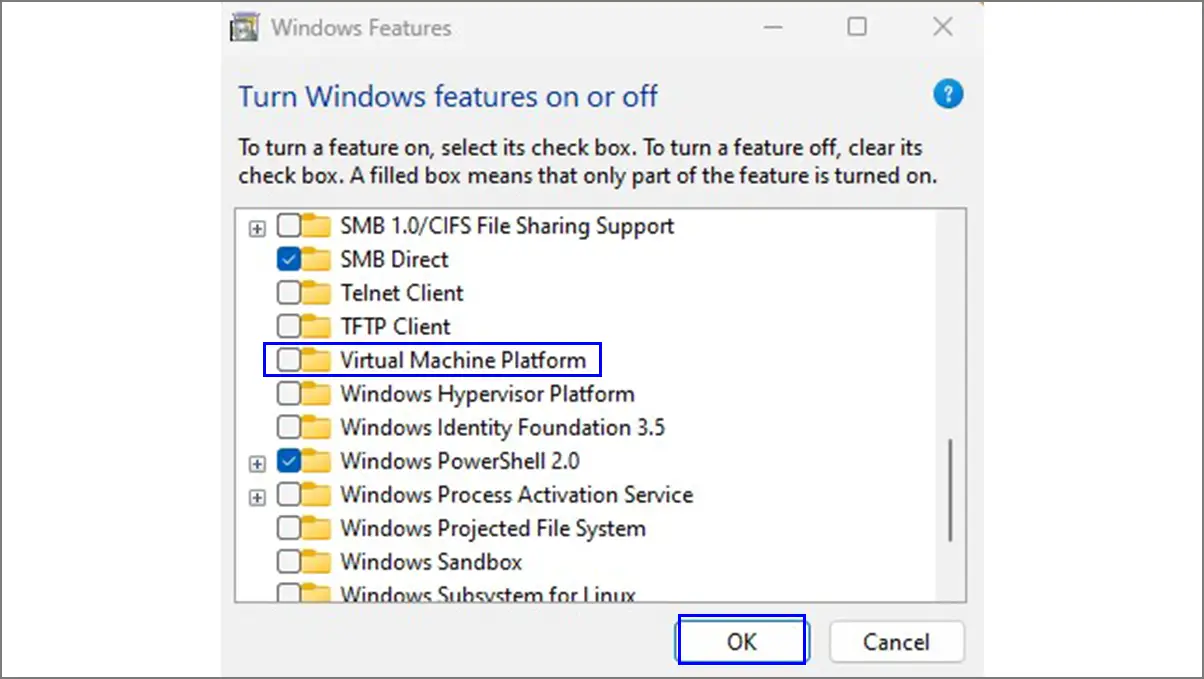
- Next, open the Start menu > Search for Windows Features.
- Click on Turn Windows Features on or off to open it.
- Then, scroll down the list of Windows features.
- Uncheck the Virtual Machine Platform box.
- Click on OK and restart the computer.
21. Turn Off Keyboard Accessibility
Sticky Keys is an accessibility feature on Windows 11 that allows users to press multiple keys at the same time to execute specific actions. But it doesn’t come in handy for most users in daily life. Meanwhile, toggle keys and filter keys can also cause issues with the keypress experience. As these features eat up a lot of system resources, you should turn them off for a better gaming experience.
Open the Settings app on Windows 11, then click on Accessibility on the left pane. Go to Keyboard and turn off Sticky Keys, Toggle Keys, and Filter Keys one by one. Once done, reboot the system.
22. Adjust Boot Advanced Options
In general, the advanced boot option under system configuration uses a lower number of core processors, but it hampers the overall performance. You should follow the steps below to use the highest number of processors for optimal performance on Windows 11.
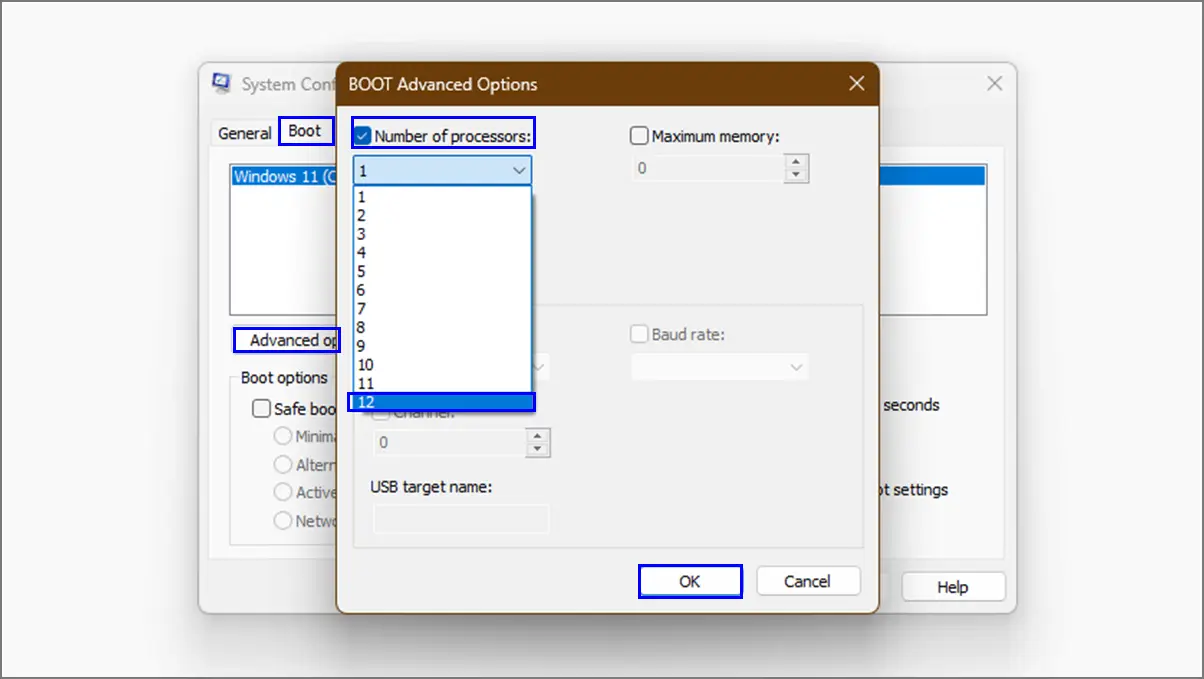
- Press the Windows + R shortcut keys to open the Run dialog box.
- Type
msconfigin the field and hit Enter to open System Configuration. - Click on the Boot tab > Go to Advanced options.
- Now, tick the Number of processors.
- Select the maximum count and click on OK.
- Click on Apply and then hit OK.
- Finally, restart the system.
23. Disable the SysMain Service
The SysMain service (SuperFetch) comes as a stock feature on Windows 11 that always runs in the background. It can seriously cause CPU spikes, disk storage, and memory consumption issues. If you’re having low RAM and low storage space, make sure to disable the SysMain service manually as follows:
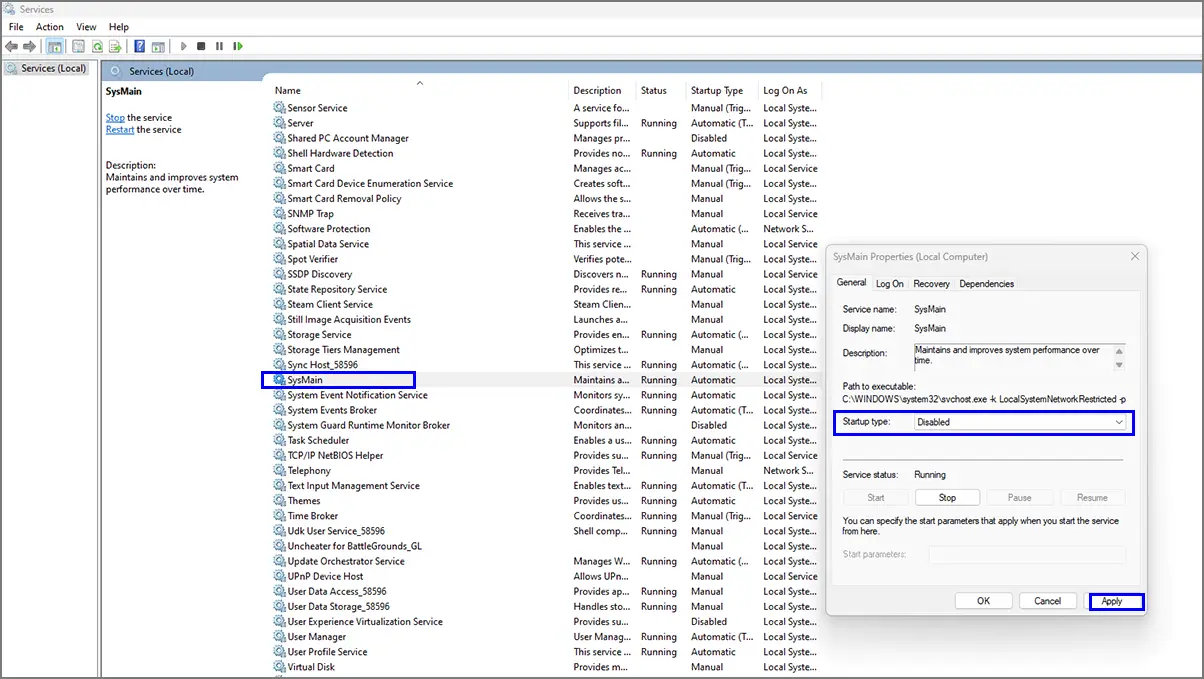
- Press the Windows + R shortcut keys to open the Run dialog box.
- Type
services.mscin the field and hit Enter to open Services. - Now, locate SysMain from the list and double-click on it.
- Under the General tab, click on Startup type.
- Select Disabled and hit Apply > Click on OK.
- Be sure to reboot the computer to apply the changes.
Optimizing Windows 11 for Better Gaming
By applying all of these optimizations or adjustments, you can significantly improve the overall gaming experience on your Windows 11 PC. Just be sure to keep updating games, system software, and drivers periodically. Try minimizing in-game graphics settings depending on your hardware specs. Closing background processes will also help you to focus on immersive gaming.
